Quick answer:
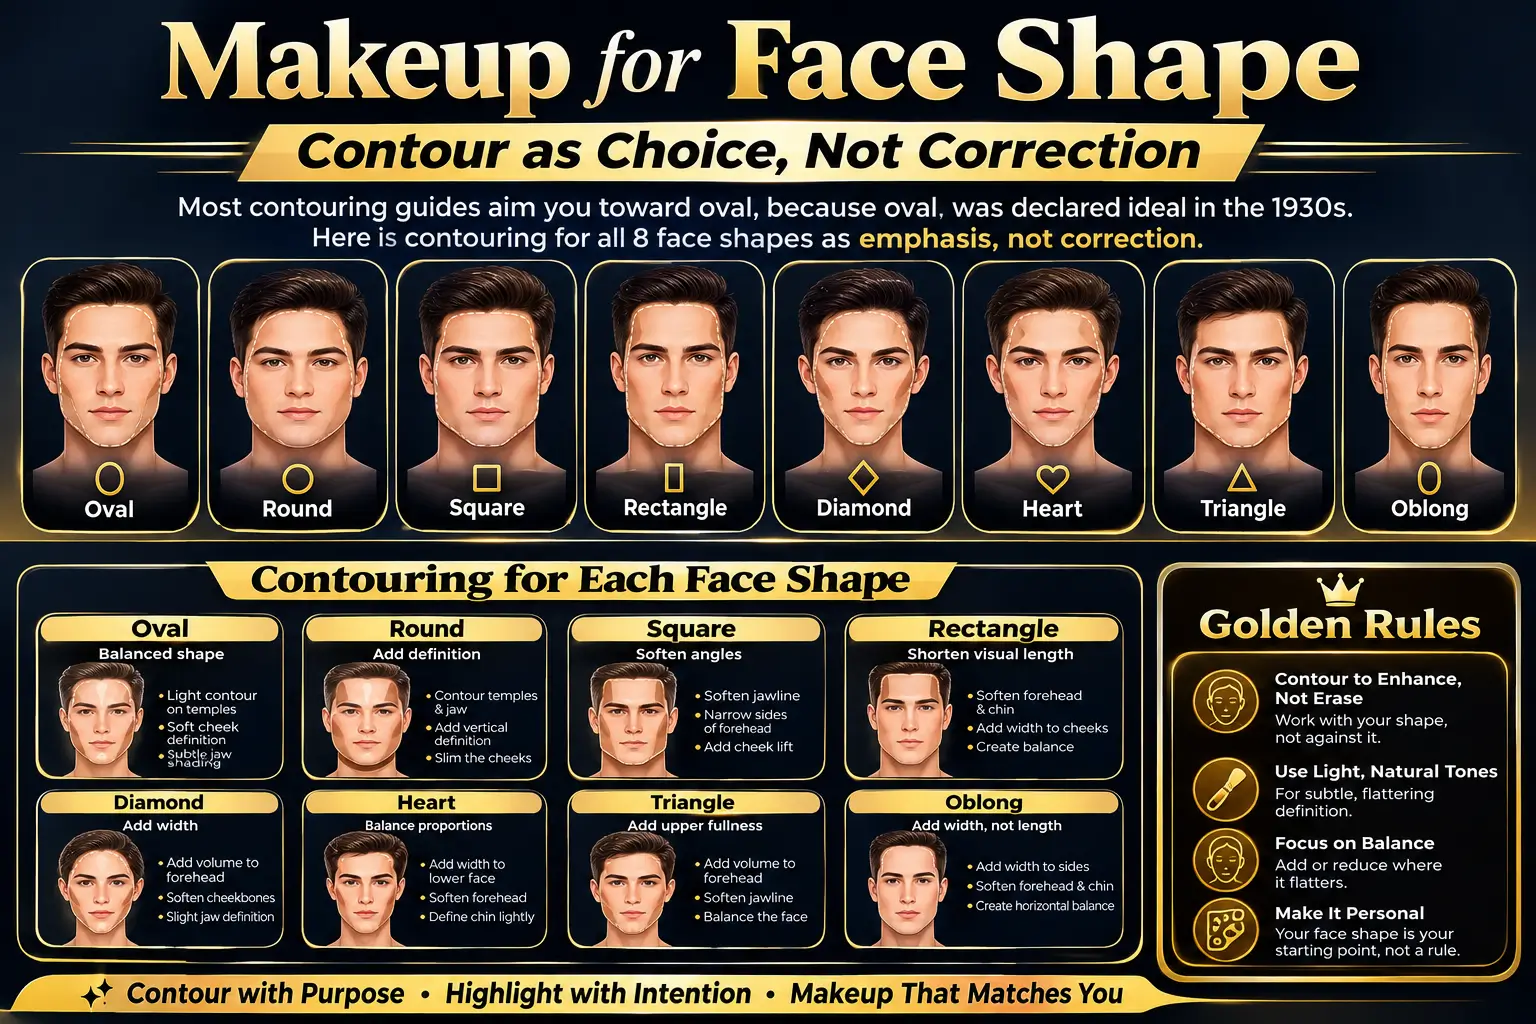
Contouring uses shadow and light to change how the geometry of your face reads. Darker shades recede, lighter shades come forward. For most faces, that means light where you want emphasis and a soft shadow where you want less visual weight, most commonly along the outer cheekbone and the jaw. The placement changes by shape, and it is covered for all 8 shapes below. What changes first is the goal: most guides aim you toward oval. This one treats that as one option among several, not the target.
Read this before you contour anything
Nearly every major contouring guide states its purpose directly. One well known brand’s own site puts it this way:
“When highlighting and contouring, the goal is to work toward a more oval-looking face; this is thought to be the ideal face shape.”
That sentence is worth pausing on, because it is the same premise behind the whole face shape chart category. Face shape charts were built in 1930s Hollywood makeup departments specifically to move faces toward oval, and “oval is ideal” was the assumption the system was built on, not a conclusion anyone tested. Contouring inherited that assumption directly, and most guides still repeat it without saying where it came from. The full history is on the face shape chart page.
So before any placement advice: you do not need to contour toward oval. You can use contour to soften a jaw, sharpen one, add definition, or do nothing at all. Every technique below is offered as an effect you can choose, not a correction you are expected to make.
How contouring actually works
Two products, one principle.
- Contour is a shade slightly darker than your skin tone, placed where you want the face to visually recede.
- Highlighter is lighter than your skin tone, placed where you want light to catch and the area to come forward.
The placements below use the same measurements as the rest of this site: forehead, cheekbone and jaw width, and jaw contour. If you have not confirmed your shape, the face shape detector does it in about ten seconds, or the quiz needs no photo at all.
Contouring for all 8 face shapes
Most contouring guides cover four to six shapes and quietly skip oblong, rectangle and triangle. Here are all eight.
| Shape | To soften the structure | To showcase it instead |
|---|---|---|
| Round | Contour along the outer cheeks and temples, blush swept upward, highlighter down the centre to add length | Skip contour, let the natural curve read as the feature |
| Square | Soft contour on the jaw corners to round them, blush in a circular motion on the apple | Sharp, clean contour along the jaw that doubles the angle deliberately |
| Oval | Little to none needed; there is no imbalance to correct | Light contour under the cheekbones purely for depth, not correction |
| Oblong | Contour at the hairline and under the chin to visually shorten the face, blush swept horizontally toward the ears | Vertical highlighter down the centre if length is the look you want |
| Rectangle | Same as oblong, plus soft contour on the jaw corners if softening the angles too | Contour the jaw corners sharply instead, to match the structure |
| Heart | Light contour at the temples and forehead sides, blush low and blended outward, highlighter on the jaw and chin | Highlighter across the forehead to let the widest point lead |
| Diamond | Highlighter on the forehead and chin, blush blended below the cheekbone toward the ear | Contour lightly under the cheekbones to sharpen the point further |
| Triangle | Highlighter on the temples and forehead, blush high on the cheekbone, light contour along the jaw | Contour the jaw more definitively if the wider base is the look you want |
The pattern to notice: every “soften” column adds light where the face is narrow and shadow where it is wide, and every “showcase” column does close to the opposite on purpose. Neither column is the correct one. They are two different results.
The technique, once you know your placement
- Prep first. Contour and highlighter both sit on top of foundation and concealer, on skin that has been moisturised. Applying either to bare or dry skin makes it patchy and separate.
- Choose a contour shade with a cool or neutral undertone, close to your natural shadow colour rather than a generic tan or bronze. A warm orange toned contour reads as a stripe of colour rather than a shadow, which is the most common mistake in this category.
- Apply less than feels right, then build. Powder and cream products are forgiving in one direction only. You can always add more; you cannot easily remove product that has set.
- Blend before it sets, using a damp sponge or a soft brush in circular motions, not straight lines. A hard edge reads as a stripe rather than a shadow.
- Check it in natural light, not just a ring light or vanity bulb. Warm artificial light flattens contour and can hide poor blending that daylight will expose.
- Highlighter goes on the highest points, the ones that would naturally catch light: the tops of the cheekbones, the bridge of the nose, the centre of the forehead, the cupid’s bow.
Common mistakes, and why each one happens
| Mistake | Why it happens | Fix |
|---|---|---|
| Contour reads as a dirty stripe rather than a shadow | Warm or orange toned product, not blended into the skin | Choose a cool or neutral shade and blend the edges out completely |
| The whole face looks flat despite contouring | No highlighter used, or placed in the same tone family as the contour | Add highlighter at the high points to create real depth, not just shadow |
| Contour disappears by midday | Applied on bare skin with no primer, or powder over cream without setting | Prime first, and set cream contour with a translucent powder if you need it to last |
| The look reads heavy in photos | Contour and blush placed in the same spot rather than distinct zones | Keep contour under the cheekbone, blush on the apple, and highlighter above both |
What contouring cannot do, and does not need to
Contouring changes how light falls on your face, not your bone structure. It is a temporary optical effect, not a correction to anything that needs correcting. If a guide frames your natural proportions as a problem contouring solves, that framing is inherited from a specific 1930s sales premise rather than from anything about your face. You are free to use contour for depth and definition without treating your starting shape as the thing being fixed.
Skin tone also matters more than face shape for one specific choice: the contour shade itself. A shade that looks natural on fair skin will look grey and ashy on deep skin, and the reverse is true for shades formulated too warm. Match the contour to your own undertone before worrying about placement.
FAQs
What is the best contour for my face shape?
There is no single best contour, because contouring can either soften your natural structure or emphasise it, and both are valid choices. Round and oblong faces most often use contour to add definition, while square and rectangle faces can use it to either soften or sharpen an already defined jaw. Confirm your shape first with the face shape detector.
Should I contour to look more oval?
Only if that is the look you want, not because oval is a correct target. The idea that faces should be contoured toward oval comes from a 1930s Hollywood styling convention that assumed oval was ideal from the outset. It was never a measured conclusion. Full history on the face shape chart page.
How do I contour a face shape that is not round, oval, square or heart?
The same principles apply. Oblong and rectangle faces generally contour at the hairline and chin to visually shorten the face. Triangle faces add highlighter at the forehead and light contour at the jaw. Diamond faces highlight both the forehead and chin while leaving the cheekbones alone. These three shapes are covered in the table above, which most contouring guides skip.
Why does my contour look muddy or dirty instead of like a shadow?
Almost always the undertone of the product. A contour shade with warm or orange undertones reads as a stripe of colour rather than a natural shadow. Choose a cool or neutral toned contour close to your own natural shadow colour, and blend the edges out completely rather than leaving a hard line.
Do I need different contour for different face shapes or just different placement?
Placement, not product. The same contour and highlighter shades work across all face shapes. What changes is where you apply them, which is why the table above is organised by shape rather than by product recommendation.
External reference on the technique: contouring.